Containers are supposed to be light-weighted. Adding unnecessary data will make it heavy to create and run. Docker provides several ways to mount storage from the host machine to containers. Volumes are the most commonly used one. It can be used to persist application data, and also share data between multiple containers as well. (local volumes cannot be shared between docker services though. You will need shared storage instead.)
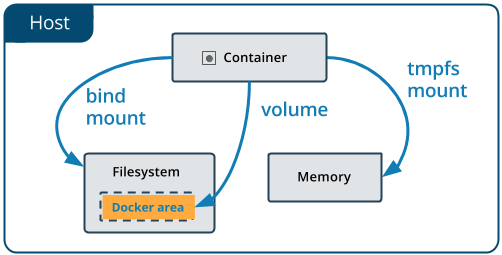
Docker provides three ways to mount data to the container: volumes, bind mounts, and tmpfs storage.
- Volumes are part of the host filesystem, but managed by docker at the specific path and should not be modified by other applications
- Bind mounts can be anywhere on the host, but can be modified by other applications
- tmpfs are in the host’s in-memory space, and never get written into the filesystem.
Generally speaking, volumes are the go-to solution to solve most of the data persistence issues in a container. Volumes can be either created by docker volume create command, or created when starting a container.
Let’s use Python virtualenv as an example.
1. Create volume
First, let’s create a volume named as virtualenv to serve as the path to store virtual environments.
➤ docker volume create virtualenv
We can check the volume by the following command
➤ docker volume inspect virtualenv
[
    {
        "CreatedAt": "2018-11-09T04:41:31Z",
        "Driver": "local",
        "Labels": {},
        "Mountpoint": "/var/lib/docker/volumes/virtualenv/_data",
        "Name": "virtualenv",
        "Options": {},
        "Scope": "local"
    }
]
2. Create container
The structure of the example app looks like this:
Dockerfilemain.py: the entrypointcreate_env.sh(used to create another virtual environment)
What main.py does is to check if the virtual environment “my_env” exists. If not, it will create it. We’re going to mount the volume created above as ~/.virtualenv folder in the container.
I use the following Dockerfile to create the simplest python image:
FROM python:3.7
WORKDIR /app
ADD . /app
RUN pip install virtualenv
CMD ["python", "./main.py"]
main.py looks like this:
import os
import subprocess

def main():
    if os.path.exists('/root/.virtualenv/my_env'):
        print('my_env already exists')
    else:
        subprocess.run(['bash', 'create_env.sh'])
        print('my_env created')

if __name__ == '__main__':
    main()
And the one-line create_env.sh
cd ~/.virtualenv/ && virtualenv my_env
3. Start container with volume mounted
We first build the python image:
➤ docker build -t docker-data-persistence .
Then to mount the volume, we use --mount argument:
➤ docker run \
  --mount source=virtualenv,target=/root/.virtualenv \
  docker-data-persistence

Using base prefix '/usr/local'
New python executable in /root/.virtualenv/my_env/bin/python
Installing setuptools, pip, wheel...done.
my_env created
As we can see above, when we run the container for the first time, it will create the virtual environment “my_env” as it doesn’t exist in the volume yet. If we run it the second time, it will say “my_env” already exists.
➤ docker run \
  --mount source=virtualenv,target=/root/.virtualenv \
  docker-data-persistence

my_env already exists
4. Inspect the volume
We can take a look into the files in the volume to verify the contents:
➤ docker run -it \
  --mount source=virtualenv,target=/root/.virtualenv \
  docker-data-persistence \
  find /root/.virtualenv/my_env/bin

/root/.virtualenv/my_env/bin
/root/.virtualenv/my_env/bin/python3
/root/.virtualenv/my_env/bin/activate.csh
/root/.virtualenv/my_env/bin/easy_install-3.7
/root/.virtualenv/my_env/bin/python
/root/.virtualenv/my_env/bin/python-config
/root/.virtualenv/my_env/bin/easy_install
/root/.virtualenv/my_env/bin/python3.7
/root/.virtualenv/my_env/bin/activate
/root/.virtualenv/my_env/bin/pip
/root/.virtualenv/my_env/bin/activate.fish
/root/.virtualenv/my_env/bin/pip3
/root/.virtualenv/my_env/bin/wheel
/root/.virtualenv/my_env/bin/activate_this.py
/root/.virtualenv/my_env/bin/pip3.7
5. Delete the volume
To delete the volume, we can use docker volume rm <volume-name>. However, you can’t delete a volume when there is a container that uses it, even if the container has exited.
➤ docker volume rm virtualenv